Tuesday, May 21, 2013
Faux Half Tone Colored Dot Effect in Illustrator - New or Improved Skill Day 21
I was playing with half tone dots and missed the color and clarity that can be achieved with other techniques and had a eureka moment. I combined two techniques from earlier this month for an interesting effect.
Crop a photo to an image with even numbers, the math will be easier. I cropped my antique diver dude to 8"x 10". Place the image in Illustrator.
Move off to the side of the art board and make a square, mine is .1 inches. Make a circle, or any other shape you want, with a .1 inch diameter. Center the circle on the square. Make sure circle and square are both selected. Go to Window > Pathfinder > Minus Front. Now you have a black edge with an empty center. Drag this image into the swatches panel to make a swatch. I also made another swatch where the outside edge is white.
Go back to the original image. Press command j to make a duplicate, I always prefer to start on a duplicate layer and later delete the original layer.
Here's the math portion. Select the newly duplicated image. Go to Object > create object mosaic. Select the number of tiles you want and click OK. My image is 8 x 10 and my swatch is .1 inches. I need 80 x 100 tiles.
Create a new layer. Make a 8 x 10 rectangle. Fill it with the circle/square swatch. The image looks a little odd shrunk down since it was designed for 8 " x 10. The nice thing is, since this is a vector, I can make it as large as I want.
If you want the colors to be more vibrant, bring the image back into Photoshop and bump up the Hue/Saturation.
Labels:
illustrator,
illustrator tutorial,
photoshop,
tutorial
Monday, May 20, 2013
How To Make 2 Versions of Repeating Patterns in Photoshop - New or Improved Skill Day 20
Sometimes you need a repeating pattern for a background. I used basic clip art shapes that are included with Photoshop and a photograph but you could use anything. I hardly ever use the shapes that came with Photoshop so it was good to remind myself they are there.
File > New. Choose the size for the repeat and the resolution you need. 72 pixels for web, 300 for print. I like to make everything 300 and re-size it to 72 if needed. You can make it smaller but not bigger.
You want to find the center.
View > New Guide > Horizontal. Position 50%
View > New Guide > Vertical. Position 50%
Add the art work to the square - shapes can be found on the tool bar or you can use your own art. The shape menu looks like an amoeba. Make sure fill pixels is selected. If you want the shape centered on the working space, hold the shift key and option key while dragging from the center. Shift keeps it from distorting, option keeps it centered.
Edit > Define Pattern. Give it a name.
To use the pattern:
File > New
Edit > Fill > Pattern > Custom Pattern. Click on the one you want. OK
The above makes a square, repeating, background. Here's how to have it be offset.
File > New. Choose the size for the repeat and the resolution you need.
View > New Guide > Horizontal. Position 50%
View > New Guide > Vertical. Position 50%
I used the same sunburst image but this time I changed the color to pale yellow before making the shape. Place the image in the center.
Duplicate the layer. Command j.
Filter > Other > Offset. Choose half the size of your original work space. If you started at 600 pixels, the offset would be 300.
Edit > Define Pattern. Give it a name.
Labels:
photoshop,
photoshop tutorial,
tutorial
Sunday, May 19, 2013
Super Simple Tilt Shift Effect in Photoshop - New or Improved Skill Day 14
I had no idea this was so easy to do and it's a bit of a mind bender. I got the tutorial from WeGraphics. It would be fun to lower the saturation for more of a vintage 3D effect.
My notes:
Command j to duplicate layer
Filter > Blur > Gaussian Blur. Radius 10 pixels.
To create the tilt shift effect you need to remove the fuzzy pixels. With the blurred layer selected, click on the layer mask icon, it's the rectangle with the circle inside it.
Choose a soft black brush with a hardness of 0. Your foreground and background colors need to be black and white. Start painting where you want the image to be crisp again. If you go too far, change the brush color to white, paint over the area and the image re-blurs. Black erases. white replaces.
Use the bracket keys [ ] to change the brush size.
x toggles between black and white color choices.
Labels:
photoshop,
photoshop tutorial,
tutorial
Saturday, May 18, 2013
Instagram Style Photograph With Rounded Corners in Photoshop - New or Improved Skill Day 18
Here's another Instagram style cross processing effect but this time I gave the image rounded corners. I could crop the photo to have rounded corners effortlessly in Illustrator, so instead, I'm going to do it in Photoshop. I was inspired by WeGraphics treatment but I made quite a few changes.
The original image.
I cropped the image square since Instragram is square.
Duplicate layer - command j
Cross processing colors:
Adjustment layer, choose Curves
RGB slight curve down
Red, gentle s curve.
Green, slight s curve.
Blue, slightly larger s curve than the green channel.
You can see the colors have changed a lot.
Vignette:
Click on the adjustment layer icon. Choose gradient. Gradient black to transparent. Style radial, angle 90, scale 150, reverse, align with layer. OK. Change the opacity to 40%. I did the screen shot at 50% then decided later it was a bit much, you need to choose based on your image.
A screen shot of the layers panel
Gaussian Blur:
Go to the original duplicate layer, layer one.
Apply a blur. Filter > Blur > Gaussian Blur. Radius 3 pixels. OK.
Now we bring some of the photo back into focus. Make sure the color picker is set for black. Click on the layer mask icon. Use the paintbrush tool to paint where you want the image clear. If you make a mistake paint white and it brings the blur back.
I love the layers panel, it shows you everything that is going on. The black shows where I painted the layer mask.
You can quit here.
If you want rounded corners continue below:
Click on the top layer. Merge Visible to flatten the image for cropping. If you don't merge the image you have problems with the transparency. I'd suggest putting in an incremental save as ___ in case you have problems later since merging closes all those adjustable layers.
Duplicate the original layer. Command j.
Name the new layer rounded corners. Click the layer mask icon. Click the layer mask icon again which creates a vector mask. You know this mask is active if it has the bracelets around it. You might need to click off the first layer mask thumbnail to deactivate it after you make the vector mask.
Select the Rounded Rectangle Tool.
Click on the shape layers icon, make the radius 30 pixels.
Click on the vector mask icon in the Layers Panel thumbnails, a border will appear. Drag out the shape while holding the Shift key, this keeps the shape square.
You can now see a black line around the thumbnail image in the layers panel where it is masked.
Click on the eye in the layers panel for the background layer. This deactivates being able to see the layer and allows you to see the new rounded shape.
Now we're going to give it a white border.
Add a new layer over the original image in the Layers Panel.
Go to Image > Canvas Size. I'm increasing the image by 1 inch since my image is large. OK.
This is another screenshot that shows an incremental change. My original image was 11.111. I increased it to 11.611, viewed it, and increased the canvas to 12.111.
The canvas is currently transparent.
Go to Edit > Fill
Choose the Background Color (or foreground, whichever is white.)
Toss the Original Background Image.

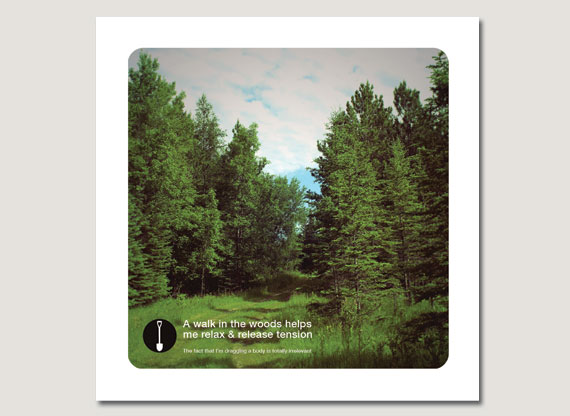
A slightly snarky poster that is Available on Etsy which uses the above technique.
Labels:
photoshop,
photoshop tutorial,
tutorial
Friday, May 17, 2013
Stereoscopic 3D Effect In Photoshop - New or Improved Skill Day 17
I wanted to make some retro 3D greeting cards and found an excellent tutorial at DesignNocturne. I tested it with my 3D glasses and it worked OK. This is the look of 3D without the functionality. You need to have 2 photos that are taken slightly to the left or right of the previous one for true 3D. I need to get out my tripod and take a photo and shift it a few inches for the second shot. The principle would remain the same, you would just use two different images, one for red layer and another for the blue layer. Deke from Lynda dot com has a terrific video.
I tried black and white as well as color photos. To make my image black and white I went to Images > Adjustments > Desaturate.
 My notes:
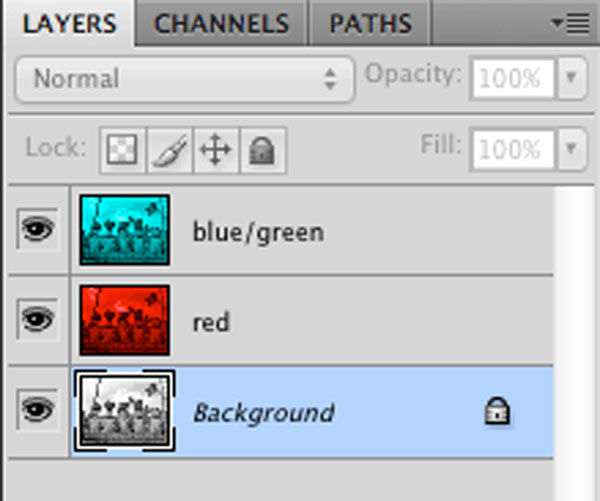
Command j twice to make 2 duplicates of the original image.
Name one of the new layers blue/green.
Name the other new layer red.
Select the blue green layer in the layers panel.
Images > Adjustments > Levels.
Channels choose Red. Drag the grey pointer all the way to the right. OK
Blending mode Screen.
Select the red layer in the layers panel.
Images > Adjustments > Levels.
Channels choose Green. Drag the grey pointer all the way to the right.
Now go to the Blue channel.
Blending mode Screen. Drag the grey pointer all the way to the right. OK
Blending mode Screen.
When you look at the layers panel you should have a blue/green image, a red image and the original image. Delete the original image by dragging it to the trash.
Click on the image with the black arrow. Use the left right arrows on the keyboard to nudge the image. You want the blue to become visible on the right since that's the side the blue is on your 3D glasses
Labels:
photoshop,
photoshop tutorial,
tutorial
Subscribe to:
Posts (Atom)


