Monday, May 13, 2013
Colorful Grunge Portrait in Photoshop - New or Improved Skill Day 13
WeGraphics has a really fun and easy tutorial for coloring images using a layer mask and the paintbrush tool.
I probably should have downloaded his suggested grunge brush set but I used the one that came with the Photoshop program: his looks better.
I used Poe's vintage photo that you can find on the net.
My notes:
The background is a worn paper texture. Increase the the contrast by going to Image > Adjustment > Levels.
Choose an image.
Desaturate it by going to Image > Adjustment > Desaturate.
Increase the photo's contrast by going to Image > Adjustment > Levels. You want to have some white areas.
Apply Filter > Artistic > Watercolor for a loose painted effect.
Make a new layer.
Go to the channels panel. Command + Click on the RBG channel thumbnail.
Return to the layers panel. Press the layer mask icon, it looks like a square with a circle in it. Release the selection by clicking Command + click. Command + i to invert the colors. Delete the original photo layer.
Choose a grunge brush and paint the top level randomly with different colors. The underlying image magically appears when color is applied.
Labels:
photoshop,
photoshop tutorial,
tutorial
Sunday, May 12, 2013
Colorize a Black and White Photograph in Photoshop - New or Improved Skill Day 12
I found this wonderful vintage cowgirl image on the Internet and colorized her.
It's very simple to tint a photograph. Paint the area on a separate layer with a soft brush, blending mode soft light, and lower the opacity.
Labels:
photoshop,
photoshop tutorial,
tutorial
Saturday, May 11, 2013
Lomo Style Effect in Photoshop - New or Improved Skill Day 11
I adore Lomo photography so I was pleased to find a simple tutorial from WeGraphics for faking it in Photoshop.
This is the original photograph. I was at Dino's Gyros and spotted this shadow on a chair.
The image before playing with the Curves.
Final image.
Here are my notes from Nathan's tutorial:
Add a Gradient Fill Adjustment layer. Linear. 90 degree angle. Align with layer.
Blending mode Soft Light
Apply a Gradient Overlay layer style to the previous adjustment layer. Blend Mode Overlay. Opacity 100%. White to black for the gradient. Style Radial. Align with center. Angle 120. Scale 122.
Cross Processing:
Curves adjustment layer. Adjust the RGB channels separately. Playing with the curves to find a please combination. This will vary from photo to photo.
Go back to the oringinal photo, which is the first layer. Command j to make a copy.
Filter > Blur > Lens Blur. Blur the image by adjusting the sliders.
Layer Mask on the blurred layer. Use a soft brush and black to reveal the un-blurred image. Remember black erases, white adds.
Labels:
photoshop,
photoshop tutorial,
tutorial
Friday, May 10, 2013
Instagram Nashville Style Effect in Photoshop - New or Improved Skill Day 10
I'm still investigating Instagram type filters, this is Nashville and the tutorial is from Abduzeedo. I can see where this would be good with the right photo but I don't think this was it.
My notes:
Command j to duplicate image. Rename new layer Nashville. Delete the original layer.
Create a new layer and fill it with red 247, green 217, blue 173. Opacity 100%, blending mode Multiply.
Click on the Nashville layer. Go to Image > Adjustments > Curves. Green channel output 37. Blue channel output 133.
Image > Adjustments > Levels. Change gamma (the middle) to 1.36, input to 236.
Image > Adjustments > Brightness/Contrast. Brightness 6, Contrast 51. Use Legacy should not be checked.
Image > Adjustments > Curves. Green channel input 13. Blue channel input 88.
Image > Adjustments > Brightness/Contrast. Brightness -6. Contrast 33.
Image > Adjustments > Curves. Red channel output 4. Blue channel output 14.
Merge all layers to visible.
Labels:
photoshop,
photoshop tutorial,
tutorial
Thursday, May 9, 2013
Vintage Polaroid Effect in Photoshop - New or Improved Skill Day 9

I wanted to make a vintage style photograph into a Polaroid type image and found 2 good sources. Design Nocturne has a tutorial for the 1970's era image and fuzzimo has a selection of free, hi-res, blank Polaroid frames.
I should have cropped the image before processing it in Photoshop since I lost a lot of the tinting but I did this for the process not the product. Next time...
These are my notes since I've had sites disappear; I made a few small changes to the original tutorial.
Crop photo to fit Poloroid frame.
Command j to duplicate the original photo.
Filter > blur > Gaussian blur. Radius 3
Adjustment layer > hue/saturation. Saturation -35.
Adjustment layer > solid color > #ff0030. Blending mode screen, opacity 25%.
Adjustment layer > solid color > #a26334. Blending mode hard light, opacity 20%.
Adjustment layer > gradient > use red #ff0030, linear gradient at 180 degrees. Blending mode screen, opacity 25%.
Grain layer. Edit > fill > 50% grey. Filter > noise > add noise, set the amount to 100%. Blending mode overlay, opacity 10%.
Place the merged image onto a Polaroid frame and re-crop.
Labels:
photoshop,
photoshop tutorial,
tutorial
Wednesday, May 8, 2013
Instagram Style Photo With Black Mounting Corners in Photoshop - New or Improved Skill Day 8

I need to get an iPhone so I no longer have to do cross processing effects in Photoshop.
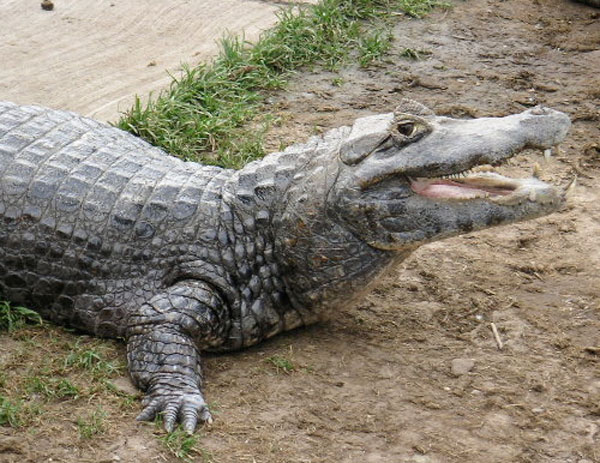
The alligator not only posed, but I could swear he was smiling.
This is what you'll end up with, an enhanced photo with mounting corners. I have a screen shot of the layers tab further down which helps explain a lot.
Press command j to make a duplicate of the original photo.
Click on the layer adjustment button and choose hue/saturation. Move the saturation slider until the color is dulled.
The image dulled.
Click on the adjustment layer and choose exposure. Shift the sliders.
Click on the adjustment layer and choose gradient. Make the transparent gradient radial, 150% scale, check reverse. OK
Open blending modes and choose soft light.
Image > adjustments > photo filter. Choose sepia and set the density for 20%.
Go to the layers tab, click on the original image at the bottom and press command j.
Apply a Gaussian blur to the new image. Filter > blur > Gaussian blur. Choose a 5 pixel radius.
To add a white border go the original image on the bottom of the layer tab and add a new layer.
Image > canvas size. Add .5 inches. I tired 1 " and it was too large.
The canvas is empty and needs to be filled with a color. Go to edit > fill and choose white.
The photo mounting corner was scanned and then cut out with the pen tool. I saved it as a png so the background could remain transparent. I uploaded it here as a png if you want to use it, it's 1" square at 300 dpi.
Place and size each corner on it's own layer. You can rotate the image by going to edit > transform . rotate. When you are happy with the position, click the check mark.
I gave the corners a subtle drop shadow. Layer > layer style > drop shadow. The light is coming from the upper left so I didn't bother with a drop shadow for the lower right mounting corner.
Labels:
photoshop,
photoshop tutorial,
tutorial
Tuesday, May 7, 2013
Spooky Old Folded Photo Photoshop Tutorial - New or Improved Skill Day 7
I wanted to make a ghostly, blured image so I started with this photograph of Minneapolis. It was taken early Sunday morning and was devoid of people.
Here is the final image.
- Open the photo in Photoshop
- Go to images > adjustments > desaturate
- Press Command j 3 times to make 3 duplicate layers
- Drag the original background image to the trash
- Select the middle layer and name it soft light. Go to blending options, choose soft light.
- Select the top layer and name it hard light. Go to blending options, choose hard light.
- Select the bottom background layer. Go to filter > blur > motion blur. Set the angle to -90 degrees and the distance to 15 pixels.
- Select the middle layer named soft light. Go to filter > blur > motion blur. Set the angle to -90 degrees and the distance to 80 pixels.
- Select the top layer named hard light. Go to filter > blur > motion blur. Set the angle to -90 degrees and the distance to 200 pixels.
- Select the bottom background layer. Go to filter > noise > add noise. Amount 25%, Gaussian, monochromatic.
- Add a new layer on top of the hard light layer. Go to filter > render > clouds. You need to have a more defined image so go to image > adjustments > levels. Move the sliders. OK. Go to blending mode and choose overlay. Change the opacity to 10%.
- Click on the adjustment layer icon. Choose brightness/contrast. Brightness 20, Contrast -30.
- Click on the adjustment layer icon. Choose gradient. Style radial, angle 90, scale 150, reverse, align with layer. Change the opacity to 60%.
- Add a new layer on top of the gradient layer. Place an image of paper, I used a ratty old book. Make the blending mode multiply. Opacity 75%.
I find it helpful to see the layout in the layers panel.
Labels:
photoshop,
photoshop tutorial,
tutorial
Monday, May 6, 2013
Forbidden Planet in Photoshop - New or Improved Skill Day 6
Chris Spooner has a fun tutorial for making a space scene in photoshop.
It takes quite a few photos to complete the image. The Helix Nebula is from the NASA site and is royalty free.
The spaceship from Forbidden Planet was borrowed from the show.
Chris had a better image for the main planet, mine is a rock from the pond that is covered in moss. The moon is the rusty stovepipe on the wood burning stove at the cabin.
I've never played with Screen Dodge before and it gives a interesting effect. Actually, I don't use Photoshop much except for photos so it was good to attempt something artsy.
Labels:
digital art,
photoshop,
photoshop art
Sunday, May 5, 2013
Repeating Swatch Pattern in Illustrator - New or Improved Skill Day 5

I wanted to make a garden themed blueprint for my garden area and found this vintage drawing at The Graphics Fairy.
Chris Spooner has a clever way to make a lined grid in Illustrator. I would have made actual lines but he made his version using the swatches panel. His way was much faster and rather magical.
I used the line segment tool to make a .25 pt line .15748 inches long. The line weight determines how thick the line grid will be.
Command c to copy.
Paste in Front, command f
Go to Object > transform > rotate 90 degrees.
I knew I wanted the lines to be white so I changed the line color to white and dragged them together into the swatches panel.
You can't see the crossed lines since they are white but they are there. To use the swatch make a rectangle and fill the shape with the swatch the same way you would use color. To see the lines you need to either place a colored rectangle on top and then send it to back or place it on it's own layer.
Available on Etsy.
I wanted to keep playing so here is a black square that I rotated 45 degrees and dragged into the swatches.
Yes, photos work as well. I cropped and resized this photo of Paul Bunyon and Babe the blue ox in Photoshop and gave it it a small border.
Labels:
digital art,
illustrator,
illustrator tutorial,
tutorial
Saturday, May 4, 2013
Hand Tinted Photo Effect in Photoshop - New or Improved Skill Day 4
I found another nice tutorial from Design Nocturne, he described it as an elegant sepia but it looks more like vintage hand tinting to me. I did two versions, one I added a light gradient and one followed his directions more closely. I thought it would be good to reuse the Grain Belt sign for comparison to yesterday's vintage image. I didn't photograph the steps since the original tutorial does a very nice job, the notes are a reminder in case the site disappears.

Tinted in Photoshop
Tinted in Photoshop with a gradient.
Layer 1 - Original photo
Layer 2 - Command j to duplicate the layer
Filter > Blur > Gaussian Blur. Radius 3 pixels. OK
Set the blending mode to Lighten, 80% opacity.
Layer 3 - Adjustment layer > Brightness/Contrast. Brightness 20 and Contrast 20.
Layer 4 - Adjustment Layer > Hue/Saturation. Set saturation at -70.
Layer 5 - Adjustment Layer > Solid Color. Color # 957426. Blending mode Soft Light, Opacity 20%.
Layer 6 - Adjustment Layer > Gradient. Choose Radial, 90 degree angle, scale 100%, check reverse. OK. Make the opacity around 14% for a lighter vignette.
Labels:
photoshop,
photoshop tutorial,
tutorial
Friday, May 3, 2013
Instagram Style Sepia Effect in Photoshop - New or Improved Skill Day 3
The Grain Belt Beer bottle cap billboard is located a little off Downtown Minneapolis. I used Photoshop to give it an older, light sepia look with a slightly darkened edge.
Link to a tutorial:
My notes.
Layer 1. Go to Images > Adjustments > Desaturate
Layer 2. Adjustment layer button > Solid Color. Input color # ddddbf. Click OK. Change to overlay and reduce the opacity to to 50%.
Layer 3. Adjustment layer button > Solid Color. Input color # 272521. Click OK. Change blending mode to lighten
Layer 4. Edit > Fill > 50% Grey. Filter > Noise > Add noise. Amount 100%, Gaussian, check Monochromatic. OK. Change to Overlay and reduce the opacity to 15%.
Layer 5. Adjustment layer button > Gradient. Choose Radial, 90 degree angle, scale 100%, check reverse. OK. Make the opacity around 22% for a lighter vignette.

This is my old method for sepia. You desaturate the photo and play with the Hue/Saturation presets. The presets have an orange cast that I never really cared for.
Labels:
photoshop,
photoshop tutorial,
tutorial
Thursday, May 2, 2013
Instagram Style Cross Processing Effect in Photoshop - New or Improved Skill Day 2
I took this photo of the Spoonbridge and Cherry, a few years ago with a very nice digital SLR camera and decided to make it look like a vintage cross processed image that you would find in Instagram.
It's ironic making photos look like vintage shots when I've spent a lot of time in Photoshop cleaning up actual old photos to get rid of the vintage appearance.
Design Nocturne has a very good tutorial on how to achieve this effect. I only wrote the directions for my own notes in case something happens to the link; I know I'd never remember all the steps.

Command j for new layer
Click on the adjustment layer from the bottom of the layers panel > gradient
Use a black transparent gradient > style radial > scale 150 > angle 90 > check reverse and align with layer
Change the blending mode to soft light > opacity 50% - this will darken the photo's edges
Add a curves adjustment layer
Add points to the curves as shown
Add a Brightness/Contrast adjustment layer . set brightness to plus 15 and contrast to minus 25 > check use legacy.
Add a solid color adjustment layer. Set color to 725c38. Set blending mode to color and the opacity to 25%.
Add another new layer.
Go to edit > fill and choose 50% grey. Mode normal and opacity 100%. OK
Filter > noise > add noise. Amount 100%. Gaussian. Monochromatic.
Filter > blur > Gaussian blur. Radius .5 pixels
Set the noise layer's blending mode to Overlay with a 15% opacity.

Dream bigger. I know I'm dreaming of a giant Cherry Pie.
Available on Etsy
Labels:
photoshop,
photoshop tutorial,
tutorial
Subscribe to:
Posts (Atom)