Saturday, May 18, 2013

Instagram Style Photograph With Rounded Corners in Photoshop - New or Improved Skill Day 18

Palm trees and Pacific ocean on the Road to Hana in Maui


Here's another Instagram style cross processing effect but this time I gave the image rounded corners. I could crop the photo to have rounded corners effortlessly in Illustrator, so instead, I'm going to do it in Photoshop. I was inspired by WeGraphics treatment but I made quite a few changes.

Palm trees and Pacific ocean on the Road to Hana in Maui


The original image.

Palm trees and Pacific ocean on the Road to Hana in Maui


I cropped the image square since Instragram is square.
Duplicate layer - command j

Curves panel photoshop screen shot


Cross processing colors:
Adjustment layer, choose Curves
RGB slight curve down

Curves panel photoshop screen shot


Red, gentle s curve.

Curves panel photoshop screen shot


Green, slight s curve.

Curves panel photoshop screen shot


Blue, slightly larger s curve than the green channel.

Palm trees and Pacific ocean on the Road to Hana in Maui


You can see the colors have changed a lot.

gradient fill photoshop screen shot


Vignette:
Click on the adjustment layer icon. Choose gradient. Gradient black to transparent. Style radial, angle 90, scale 150, reverse, align with layer. OK. Change the opacity to 40%. I did the screen shot at 50% then decided later it was a bit much, you need to choose based on your image.

layers panel photoshop screen shot


A screen shot of the layers panel

photoshop Gaussian blur screen shot


Gaussian Blur:
Go to the original duplicate layer, layer one.
Apply a blur. Filter > Blur > Gaussian Blur. Radius 3 pixels. OK.

photoshop background foreground colors screen shot


Now we bring some of the photo back into focus. Make sure the color picker is set for black. Click on the layer mask icon. Use the paintbrush tool to paint where you want the image clear. If you make a mistake paint white and it brings the blur back.

layers panel photoshop screen shot


I love the layers panel, it shows you everything that is going on. The black shows where I painted the layer mask.

Palm trees and Pacific ocean on the Road to Hana in Maui


You can quit here.

If you want rounded corners continue below:

Click on the top layer. Merge Visible to flatten the image for cropping. If you don't merge the image you have problems with the transparency. I'd suggest putting in an incremental save as ___ in case you have problems later since merging closes all those adjustable layers.

photoshop drop down screen shot

layers panel photoshop screen shot


Duplicate the original layer. Command j.

Name the new layer rounded corners. Click the layer mask icon. Click the layer mask icon again which creates a vector mask. You know this mask is active if it has the bracelets around it. You might need to click off the first layer mask thumbnail to deactivate it after you make the vector mask.

photoshop tool bar screen shot


Select the Rounded Rectangle Tool.

Click on the shape layers icon, make the radius 30 pixels.

Click on the vector mask icon in the Layers Panel thumbnails, a border will appear. Drag out the shape while holding the Shift key, this keeps the shape square.

Palm trees and Pacific ocean on the Road to Hana in Maui


You can now see a black line around the thumbnail image in the layers panel where it is masked.

layers panel photoshop screen shot

Palm trees and Pacific ocean on the Road to Hana in Maui


Click on the eye in the layers panel for the background layer. This deactivates being able to see the layer and allows you to see the new rounded shape.

Now we're going to give it a white border.

layers panel photoshop screen shot


Add a new layer over the original image in the Layers Panel.

canvas size photoshop screen shot


Go to Image > Canvas Size. I'm increasing the image by 1 inch since my image is large. OK.

This is another screenshot that shows an incremental change. My original image was 11.111. I increased it to 11.611, viewed it, and increased the canvas to 12.111.

fill photoshop screen shot


The canvas is currently transparent.
Go to Edit > Fill

Choose the Background Color (or foreground, whichever is white.)

Toss the Original Background Image.
Palm trees and Pacific ocean on the Road to Hana in Maui

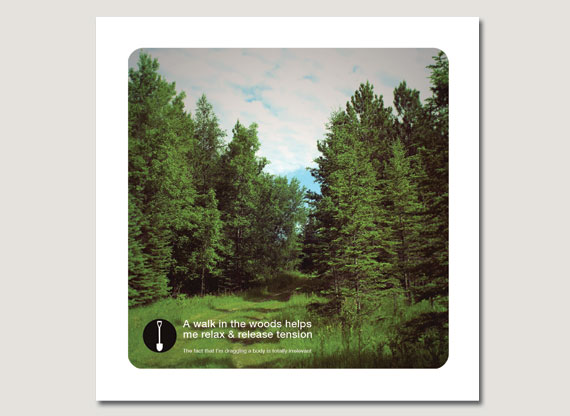
humorous poster about walking in the woods


A  slightly snarky poster that is Available on Etsy which uses the above technique.
 

Friday, May 17, 2013

Stereoscopic 3D Effect In Photoshop - New or Improved Skill Day 17

3D photo of Easter island type statues found in Hawaii


I wanted to make some retro 3D greeting cards and found an excellent tutorial at DesignNocturne. I tested it with my 3D glasses and it worked OK. This is the look of 3D without the functionality. You need to have 2 photos that are taken slightly to the left or right of the previous one for true 3D. I need to get out my tripod and take a photo and shift it a few inches for the second shot. The principle would remain the same, you would just use two different images, one for red layer and another for the blue layer. Deke from Lynda dot com has a terrific video.

I tried black and white as well as color photos. To make my image black and white I went to Images > Adjustments > Desaturate.

3D photo of Easter island type statues found in Hawaii

3D photo of man walking a dinosaur skeleton sculpture

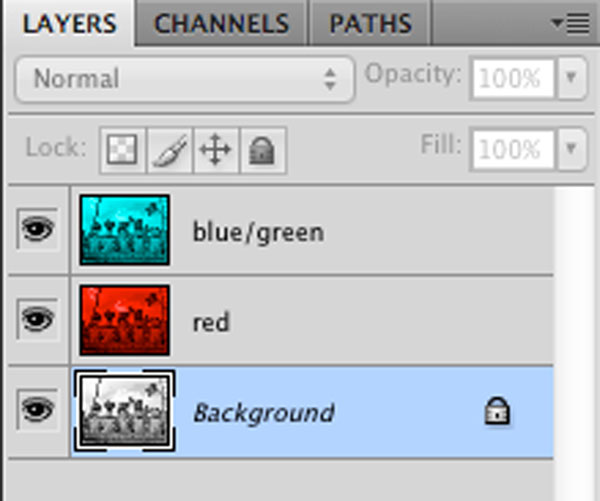
layers panel in photoshopMy notes:
Command j twice to make 2 duplicates of the original image.

Name one of the new layers blue/green.
Name the other new layer red.

Select the blue green layer in the layers panel.
Images > Adjustments > Levels.
Channels choose Red. Drag the grey pointer all the way to the right. OK
Blending mode Screen.

Select the red layer in the layers panel.
Images > Adjustments > Levels.
Channels choose Green. Drag the grey pointer all the way to the right.
Now go to the Blue channel.
Blending mode Screen. Drag the grey pointer all the way to the right. OK
Blending mode Screen.

When you look at the layers panel you should have a blue/green image, a red image and the original image. Delete the original image by dragging it to the trash.

Click on the image with the black arrow. Use the left right arrows on the keyboard to nudge the image. You want the blue to become visible on the right since that's the side the blue is on your 3D glasses

Thursday, May 16, 2013

How To Reduce Wrinkles With The Healing Brush in Photoshop - New or Improved Skill Day 16

sphynx cats


Photoshop makes it easy to reduce the appearance of a few wrinkles or tone down dark circles under the eyes. I had no good human subjects in my photo files so I found this wonderful photo of Sphynx Cats at Funny Cat Wallpapers.

This is the retouched image: the one below is the original photograph.

sphynx cats


Make a blank layer in your Layers tab over the original photograph. Click on the new layer icon next to the trash can at the bottom of the Layers area. This is where the magic will happen.

healing brush tool screen shot


Select the Healing Brush Tool. The brush size can be quickly changed by clicking the [ or ] on your keyboard.

healing brush tool settings screen shot


The default on the toolbar is probably at Current layer, you want to check All Layers. There are no pixels on the new layer, this setting allows you to make changes while keeping the image below it intact.

Option + click on an area that you want to sample the pixels, then drag your brush along the area you want to alter. The brush should be slightly larger than the width of the area you are working on. I like to start at the smallest spot and go to the larger area. I you make a mistake press Command z.

sphynx cats


The cats look a little odd smoothed out, since just like people, their wrinkles give them character.

Lower the opacity to 50%. You can still see the wrinkles but they are a bit more subtle.

sphynx cats

Wednesday, May 15, 2013

Antique Look Photo Effect in Photoshop - New or Improved Skill Day 15

Mississippi headwaters lake Itasca


 Ooo. I like this one. Simple, easy, and effective.

The original photo is the Mississippi River headwaters at Lake Itasca. I got the tutorial from 10 Steps.SG

Mississippi headwaters lake Itasca Photoshopped


The image near the end.

Mississippi headwaters lake Itasca Photoshopped


 After being colorized.

My Notes:
Select the original photo layer in the Layers tab. Go to Filter > Noise > Dust and Scratches. Radius 2. Threshold 0.

Command j to duplicate the layer. Filter > Blur > Gaussian Blur. Radius 4

grunge paper texture


Resize the grunge photo to cover the Mississippi photo. Image > Adjustments > Desaturate. Blend mode soft light.

grunge paper texture


Image > Adjustments > Desaturate. Blend mode Multiply. Image > Adjustments > Brightness and Contrast. Brightness 50.

Adjustment Layer > Levels. Values 15, 1.48, 255.

Adjustment Layer >Hue Saturation. Check colorize. Hue 38. Saturate 22. Lightness 0.

Tuesday, May 14, 2013

Blending Mode Examples in Photoshop - New or Improved Skill Day 19

I tend to use the same Blending Modes all the time so I thought I should explore some of the others. The one I found the most intriguing was Luminosity at 100% opacity. I put the original photo in Photoshop and then placed the paper texture on top. Every example was done with the same two photos.

The hardest part was getting the photos into Blogger side by side. I used a suggestion from madeinblog but Blogger fought me all the way through. Dragging the image should have been easy but having everything line up required a lot of command z's. Next time I'll process the images side by side and place them in Blogger that way.

rusty girders at mill ruins park Minneapolis Minnesota grungy paper texture
rusty girders at mill ruins park Minneapolis Minnesota

rusty girders at mill ruins park Minneapolis Minnesota rusty girders at mill ruins park Minneapolis Minnesota
rusty girders at mill ruins park Minneapolis Minnesota
rusty girders at mill ruins park Minneapolis Minnesota rusty girders at mill ruins park Minneapolis Minnesota